
iOS 9 saw the introduction of two new Core Image filters for iOS, CIHeightFieldFromMask and CIShadedMaterial, which together allow developers to create a 3D embossed image from a monochrome source, such as text or line art. The source for the shading is an image of a hemisphere and it's this that defines the surface appearance. Of course, an external image can be used for shading shading, but since we have SceneKit for rendering 3D, we can use that and add some dynamism to the embossing.
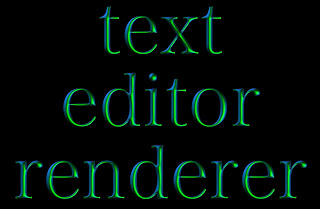
With that in mind, I present MercurialText, a proof-of-concept app that allows users to edit a source material, tweak the lighting and apply that material to user defined text in a variety of fonts. CIShadedMaterial does a fantastic job of generating a beautiful metallic embossed surface.

MercurialText is composed of two main classes, ShadingImageEditor, which allows the user to edit the material and its lighting and generates the shading image and TextEditor which allows the user to edit their text and applies the Core Image filters to generate the embossed image.
Shading Image Editor

The shading image editor's user interface consists of a SceneKit view, to display the hemisphere and a table view to display the editable parameters such as shininess and light positions.
The SceneKit's scene comprises of a solitary sphere and four omni lights. Because the sphere's radius is 1 and I'm using an orthographic camera with an orthographicScale of 1, the sphere nicely fills the frame.
To populate the table view, I've created an array of ParameterGroup each of which contain an array of Parameter children. The Parameter is interesting (at least IMHO) in that along with fundamental properties such as name and value:
struct Parameter
{
let name: String
let parameterFunction: ParameterFunction
var value: CGFloat
let minMax: MinMax
}
...it also has an enumeration with associated value of type ParameterFunction:
enum ParameterFunction
{
case AdjustLightPosition(index: Int, axis: PositionAxis)
case AdjustLightHue(index: Int)
case AdjustLightBrightness(index: Int)
case AdjustMaterialShininess
}
...which the shading image editor uses to update the scene:
func updateSceneFromParameter(parameter: Parameter)
{
switch parameter.parameterFunction
{
caselet .AdjustLightPosition(index, axis):
switch axis
{
case .X:
lights[index].position.x = Float(parameter.value)
case .Y:
lights[index].position.y = Float(parameter.value)
case .Z:
lights[index].position.z = Float(parameter.value)
}
case .AdjustMaterialShininess:
material.shininess = parameter.value
caselet .AdjustLightHue(index):
lights[index].hue = parameter.value
caselet .AdjustLightBrightness(index):
lights[index].brightness = parameter.value
}
sceneChanged = true
}
Whenever the SceneKit scene changes, the editor, which implements SCNSceneRendererDelegate, checks the sceneChanged flag and, if the change has originated from a user gesture, dispatches a UIControlEvents.ValueChanged which is picked up in the view controller.
To access the rendered image, the editor exposes a competed property, image, which is simply a snapshot() of the SceneKit view:
var image: UIImage?
{
returnsceneKitView.snapshot()
}
Text Editor / Renderer
The view controller mediates between the shading image editor and the text editor / renderer. After the image editor dispatches the value changed action, the view controller sets the shadingImage property on the text editor instance and invokes createImage():
func shadingImageChange()
{
textEditor.shadingImage = shadingImageEditor.image
textEditor.createImage()
}
It's the createImage() function that does all the hard work. A few opening guard statements ensure that it's not already rendering and the necessary images are available:
guard !isBusyelse
{
pendingUpdate = true
return
}
guardlet shadingImage = shadingImage, ciShadingImage = CIImage(image: shadingImage) else
{
return
}
Then I set the busy flag to true and create a UIImage of the original text from its label:
isBusy = true
UIGraphicsBeginImageContextWithOptions(CGSize(width: self.label.frame.width,
height: self.label.frame.height), false, 1)
label.layer.renderInContext(UIGraphicsGetCurrentContext()!)
let textImage = UIGraphicsGetImageFromCurrentImageContext()
UIGraphicsEndImageContext();
The actual image filtering is done in a background thread to keep the user interface responsive. I create copies of my two Core Image filters, this is probably not necessary in this project, but I think is probably best practice according to this guidance from Apple:
CIContextandCIImageobjects are immutable, which means each can be shared safely among threads. Multiple threads can use the same GPU or CPUCIContextobject to renderCIImageobjects. However, this is not the case forCIFilterobjects, which are mutable. ACIFilterobject cannot be shared safely among threads. If your app is multithreaded, each thread must create its ownCIFilterobjects. Otherwise, your app could behave unexpectedly.
dispatch_async(dispatch_get_global_queue(DISPATCH_QUEUE_PRIORITY_DEFAULT, 0))
{
let heightMapFilter = self.heightMapFilter.copy()
let shadedMaterialFilter = self.shadedMaterialFilter.copy()
heightMapFilter.setValue(CIImage(image: textImage),
forKey: kCIInputImageKey)
shadedMaterialFilter.setValue(heightMapFilter.valueForKey(kCIOutputImageKey),
forKey: kCIInputImageKey)
shadedMaterialFilter.setValue(ciShadingImage,
forKey: "inputShadingImage")
[...]
...and now I'm ready to get the final image from the shaded material filter and generate a UIImage:
let filteredImageData = shadedMaterialFilter.valueForKey(kCIOutputImageKey) as! CIImage
let filteredImageRef = self.ciContext.createCGImage(filteredImageData,
fromRect: filteredImageData.extent)
let finalImage = UIImage(CGImage: filteredImageRef)
To ensure the screen updates, setting my image view's image property needs to happen in the main thread. After doing that, I also see if there's a pending update and re-invoke self.createImage() if that's the case:
dispatch_async(dispatch_get_main_queue())
{
self.imageView.image = finalImage
self.isBusy = false
ifself.pendingUpdate
{
self.pendingUpdate = false
self.createImage()
}
}
To get the best performance, I've followed Apple's guidelines and created my Core Image context from an EAGL context and turned off colour management:
let ciContext = CIContext(EAGLContext: EAGLContext(API: EAGLRenderingAPI.OpenGLES2),
options: [kCIContextWorkingColorSpace: NSNull()])
In Conclusion

CIHeightFieldFromMask and CIShadedMaterial do a fantastic job of creating gorgeous looking 3D renderings from flat text. Executing those filters in background threads mitigates the fact they can take a few moments to execute and keep the user interface responsive. Using SceneKit rather than an external image editor allows the fine tweaking of the final results.
As always, the source code for this project is available at my GitHub repository here. Enjoy!